Before installing the system, closely inspect the roof itself. The roof is the solar system’s foundation; consequently, its condition will influence the future functionality of the system. Begin by honestly inspecting its age and wear or looking for damage. If there are curling shingles, cracked tiles, or significant wear to flashing, this should be repaired first. A sound roof minimizes the chances of leaks at mounting holes and any retrofit just a few years later.
Verify the roof’s structure and deck next. Solar equipment adds weight, with certain roof types bearing a heavier load. Most home framing and decking can support typical PV equipment, but this should be confirmed by a roofing professional or structural engineer, particularly if the roof is older or lighter framed. If heavy roof components are called for or a tile roof is involved, you will want a specialist familiar with the flashing and mounting methods required for those materials. Doing this saves time and money early on and helps protect the warranty on both the roof and the PV system.
In the Northern Hemisphere, a south-facing roof with little or no shade generally provides the best annual output, but not all houses are ideally located. An accurate site assessment considers the sun’s path throughout the year, not just today’s angle. Trees, chimneys, vents, and neighboring buildings all cast shade at various times, reducing production. Discuss options such as microinverters or power optimizers if shading cannot be avoided, which help individual panels perform better under partial shading conditions. Even if the roof is heavily shaded, you may still get some value out of solar. However, you want an exact production estimate to avoid overpaying for an underperforming system.
Plan for water management and fire safety. Around any solar mount, which creates a penetration, there must be sealing to prevent leakage; thus, the design should keep drainage clear. Fire code often mandates clear access paths and setback distances from panels, so check local regulations and your home insurance requirements. A well-thought-out mounting plan reduces the potential for leaks, improves longevity, and makes future repairs easier. If anything looks amiss with respect to access, drainage, or drainage paths, fix it now rather than later.
Advantages of Pairing Solar with Your Roofing System
The leading reason homes install solar is to cut energy costs. A correctly sized system cuts back the electricity drawn from the grid, resulting in significant savings on many homes power bills. Savings can thus accrue quite quickly, depending on your local rates and energy consumption patterns, especially if panels are paired with a smart inverter and a monitoring system that will let you spot efficiency losses early. The largest benefit occurs during long-term operation, not in a single quarterly statement.
Another major plus can be potential home value appreciation. Homes with solar installations often draw buyers who want lower operating costs and a cleaner energy footprint. Buyers in many markets are willing to pay a premium for homes that come with proven solar setups and a clear maintenance history behind them. The point of sale for solar can thus be a compelling one if you plan to move in the next decade. Keep a copy of installation receipts, warranties, and performance data so you can demonstrate reliability to a future buyer.
In some circumstances, a solar roof can also extend service life. The panels protect it from direct sun and thus help reduce extreme heat that some roofing materials age brought on. While this doesn’t guarantee that each underlying material will last longer, a reduction in thermal cycling can help in hot climates. Remember that the protection lasts only to the extent of the panels and the mounting hardware around them. A good seal and strong flashing remain vital to keeping water out.
Another layer of benefit comes with storage-ready systems. When you connect a battery bank or a home energy management system, you get resilience in outages and more control over when the power is drawn from the grid. In many cases, adding storage to roof-mounted PV turns a simple energy saver into a more reliable power source for critical loads. This combination can be a smart move, even at a larger upfront cost, if you live in an area subject to frequent storms or outages.
Practical Considerations Before Installation
Permits, codes, and contractor credentials come first. Solar covers electrical and building system areas. All the proper permits and inspections must be obtained. Verify that the installer has current licenses and insurance and is knowledgeable about local building codes and utility interconnection regulations. A competent team will pull all the relevant permit paperwork, work with the utility on net metering where that option is available, and schedule inspections at the correct milestones. Skipping this step creates risk and can delay production.
There are a number of ways the roof warranty interfaces with the solar system. Some roof warranties mandate only certain attachment methods. Others will cover leaks only if the roof was in good condition at the time of installation. Carefully review your warranty documents and ask the installer to clarify what the situation is should a leak or a panel failure incident take place after years of service. If you are near the end of a roof’s life, it may make sense to replace the roof before adding PV so that you don’t duplicate work or void existing protections.
The solar installation ties into the home’s main electrical panel and its load and capacity. Available space in the main panel, the presence of the main disconnect, and the overall load must all be evaluated. There can be a need for service upgrading if your service is older or nearing its capacity. Sometimes, installing a second electrical subpanel is part of the plan. A good installer will review and provide a clear path to a safe and compliant connection.
The decision has to do with financial incentives, financing prospects, and similar initiatives. Substantial cost reductions in federal, state, and local programs are possible. Some utilities provide performance-based incentives or time-of-use rate plans that maximize savings. It is also important how total costs, maintenance responsibilities, and what happens at the end of the term when loans or leases are billed. Careful financing ensures that you maximize returns without losing payment predictability.
System Design – Orientation, Tilt, and Roof Type
Panel placement should balance production, safety, and roof integrity. Due south or near-south is usually the strongest, but the actual direction of your roof will drive the decision. In some cases, an east-west arrangement can give really nice daily production with fewer spikes in peak hours. Tilt is important, too. A fixed tilt close to the latitude angle is fine for many homes. Adjustable tilts can ramp up winter or summer production if you expect a lot of energy use swings through the seasons.
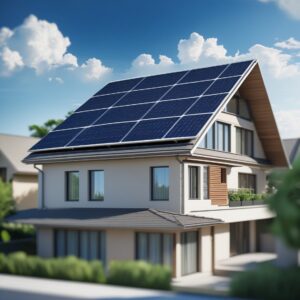 Roof type frames every mounting choice. Asphalt shingles are the most common and easiest to outfit with rail-mounted systems that do not require special flashing. Metal roofs frequently ask for specialized clamps and flashing designs to prevent leaks. Clay or concrete tiles need careful flashing against water intrusion where panels attach. For a flat or low-slope roof, one might turn to ballast racks or ballast-based mounting instead of traditional penetrating mounts. The aim is to achieve a secure, watertight installation that also minimizes the chance of panel movement during high winds.
Wind resistance and roof integrity hinge on the mounting method. The best way of penetration is that there will be a direct path for water to the roof deck, so having good flashing and sealants is fundamental. Non-penetrating systems, or ballast ones, reduce leak risk but require a solid, rigid roof surface and careful engineering to maintain stability. A good installer will tailor the mounting method to your roof. Materials, slope, and loading will be the basis of any design. They will plan cable routing to keep lines neat, weatherproof, and easy to service.
Layout and shading analysis complete the design. A shading study of the potential impacts of tall trees, chimneys, or other structures guides panel spacing and orientation tweaks, including whether microinverters or power optimizers are warranted. Under partial shading, max. Participation in system design takes into account any future roof work. If you expect a roof replacement, choose a layout that minimizes the number of penetrations you will have to remove and reseal later.
Installation Process and What to Expect
From contract signing to final inspection, a solar installation follows a clear path. The first step is a site survey. That survey validates roof condition and determines the proper number of major panels, wiring routes, and mounting hardware choices. The survey team will do the final measurements, look for shading, and collect electrical data for a more precise proposal for you. Finish it, and you have a clear plan in writing, with a schedule, system size, and cost.
The real install is usually split over several days. Crews work to prep the roof and install the mounting rails, really ensuring that the flashings are sealed. The panels go up in a controlled sequence, then wiring, inverter mounting, and electrical interconnection. It’s a job where safety, weatherproofing, and cable cleanliness are watched like a hawk. There will be some temporary disruption to attic access, normal noise, and a few penetrations as cables are drawn to the main service panel.
Every branch is tested by the installer, inverter communication is verified, and performance data visibility is confirmed over your monitoring app. The job includes basic maintenance, safety remarks, and production figure reading. You provide the operation manual and warranty for the system and plan for annual checkups. If anything is not as promised, bring it up while still under warranty or service terms.
Maintenance, Longevity, and Warranties
Solar equipment is relatively low maintenance but not maintenance-free. Panels should be cleaned occasionally for dust, pollen, and bird dropping, which all reduce output. In a dry climate, water rinsing a few times per year would suffice. More frequent cleaning might be in order in dustier areas. Do not scrub with anything harsh or use abrasive cleaners that could scratch the surface. Usually, a soft brush or microfiber cloth and water alone will be fine.
As part of routine inspections, solar hardware and flashing should be checked. See if any of the clamps have come loose or the fasteners have corroded or if there is evidence of water intrusion at the roof penetration. Handling minor issues quickly prevents major leaks and keeps the system at the top of its game. If panels are missing, if there is abnormal shading, or if new growth creates shade along the site, call your installer in for an immediate check.
Most solar modules still have a 25-year performance warranty with the typical output guarantee of about 80 to 90% of the original rated power after 25 years. Inverters often have shorter warranties, often 10 to 12 years for most, longer for the latest microinverter setups. The mounting hardware and roof penetrations typically have a separate warranty period connected to the installer or manufacturer. Have all the warranty documentation at hand and keep their service contacts in a separate file.
Financials, Incentives, and Return on Investment
In all cases, price ranges depend on roof size, system type, and local labor rates. The price range for a complete rooftop PV install generally falls somewhere in the mid-range for the area, while your exact number depends on many factors. A good way to understand the cost is to compare several fully detailed quotations, breaking down each, including panels, inverters, racking, permitting, and labor and maintenance charges. Do not just look at one figure, but get a complete picture that includes monitoring and warranty coverage.
Up-front costs can be reduced by federal, state, and local programs. Utilities give performance incentives or time-of-use rate favors during high-usage weekdays, assisting in financial justification for a bigger system or storage plan. If you were to consider battery storage, consider added costs plus possible incentives particular to home energy storage. A well-planned system with appropriate incentives attached can offer good payback periods and low monthly operating costs.
Set production and consumption goals for maximum ROI. So energy produced covers most of your typical daytime needs, scale back the system. Take that further with a demand response plan or smart home energy manager and shift heavy loads into the daylight hours. Solar makes sense relative to easily stored power, but it is sensible in areas prone to outages or where prices are high. Thoughtful design aligned to your life will deliver money over time, the best return, and the most immediate value.