Roof damage is a homeowner’s nightmare that can be triggered by storms, hail, or wear and tear over time. Home insurance can provide a safety net in these situations, covering the cost of repairs or replacements. Navigating roof insurance claims can be a daunting task, but with the right knowledge and guidance, you can ensure a smoother process that gets your roof repaired or replaced without unnecessary stress.
 1. Assessing the Damage
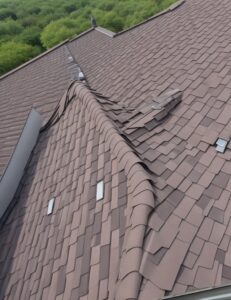
The first step is a thorough damage assessment.Before you reach out to your insurance company, take the time to document the extent of the damage. Use your smartphone or camera to capture clear images of any visible roof damage, both from a distance and up close. Make sure to photograph any fallen debris, leaks, or missing shingles. This visual evidence will be invaluable when submitting your claim.
It’s wise to bring in a professional roofing contractor. They’re trained to spot even the tiniest hints of damage that might escape your notice. Their expert assessment can carry significant weight when you’re filing your claim.
Take notes on everything you find – no detail is too small. Describe the damage, note the affected areas, and date your findings. Pair your notes with the photos you’ve taken to create a comprehensive record. This record’s your evidence when you’re presenting your case to the insurance company.
2. Review Your Insurance Policy
Understanding your insurance policy is key to ensuring that you receive the maximum coverage for your roof repairs. Different policies have varying terms and conditions, so take the time to review your policy thoroughly. While one policy might cover hail damage, another might only kick in for windstorms. It’s essential to know what you’re protected against.
Start by reading the declarations page, which is like the executive summary of your policy. It outlines the basics, like your coverage limits, deductible, and policy term.
Your policy’s coverage section outlines exactly what your insurance company will pay for in case of roof damage. Some policies might even cover temporary housing if your home becomes uninhabitable due to roof damage.
You need to know the exclusions in your policy. Exclusions are situations or perils that your policy explicitly won’t cover. Common exclusions might include wear and tear, poor maintenance, or neglect. Knowing these can save you from unexpected disappointments later.
If your repair costs exceed the maximum amount limit, you might be on the hook for the rest. Understanding these numbers can help you plan financially and avoid surprises.
3. Contact Your Insurance Company
It’s time to contact your insurance company. Most insurers have a claims hotline or online portal for initiating claims. When speaking with a representative, be sure to provide accurate and detailed information about the damage. Use the images you captured as visual support for your claim.
You’ll need to provide essential details about the damage – what caused it when it happened, and the extent of the harm. This information will help your insurance company assess the situation and determine the appropriate next steps.
Your insurance company will guide you through the process of filing a claim. This usually involves completing a claim form and providing any additional documentation, such as photos or reports from contractors who’ve assessed the damage.
Most insurance policies have specific deadlines within which claims must be reported. Missing this window might result in complications or even a denial of your claim.
As you engage in the call, keep a record of the conversation. Jot down the date, time, the name of the person you spoke to, and the key points discussed. This documentation becomes your safety point in case of any discrepancies or misunderstandings during the claims process.
4. Schedule a Roof Inspection
In many cases, the insurance company will send an adjuster to assess the damage firsthand. During the roof inspection, be present to point out the visible damage and share the images you captured. This will ensure that the adjuster has a comprehensive understanding of the situation, potentially resulting in a more accurate assessment of the damage.
5. Obtain Multiple Repair Estimates
It’s wise to obtain multiple repair estimates from reputable roofing contractors. Every roofing contractor may approach the job differently, and comparing their proposals allows you to see the nuances and make a more educated decision.
Each estimate outlines the scope of work – the tasks that need to be completed. The more detailed the estimate, the better you’ll understand what’s involved in the repair process.
Multiple estimates allow you to assess not only the costs but also the quality and expertise of each contractor. Don’t just focus on the price – consider the reputation, experience, and past work of each professional.
6. Review the Insurance Settlement
After that, your insurance company processes your claim, and they will provide you with a settlement offer. Review this offer carefully to ensure it aligns with the damage and repair estimates. This offer is based on the damage assessment, repair estimates, and the terms of your policy. Take the time to understand the breakdown of the offer and ensure it’s in line with your expectations.
If you believe the settlement offer doesn’t accurately reflect the damage or repair costs, you have the right to negotiate. Don’t hesitate to reach out to your insurance company and provide evidence that supports your case. This is where the documentation you’ve gathered throughout the process becomes invaluable.
When you’re unsure about the terms, calculations, or overall value of the offer, consider consulting with a public adjuster or legal expert who specializes in insurance claims. Their opinion will help you make informed decisions.
7. Start the Repair Process
Choose a reliable and experienced roofing contractor who can execute the repairs or replacements efficiently. Make sure to keep all communication and documentation related to the repairs, as this information may be needed for future reference.
Stay in touch with your chosen contractor, discussing timelines, materials, and any potential hurdles. Communication ensures that everyone is on the same page. That can reduce the chances of misunderstandings.
8. Document the Repairs
Continue documenting the work being done. Take photos at various stages of the repair to provide evidence of the quality and thoroughness of the work. This documentation can be valuable in case any issues arise in the future.
Documenting the repairs allows you to create a before-and-after contrast that’s not just visually impactful but also supports your insurance claim. Keep a detailed record of the repairs, noting the dates, work done, and any materials used.
9. Final Inspection
Request a final inspection from your insurance company after repairs are complete. This inspection is your opportunity to ensure that every detail has been attended to and that the repairs meet your expectations.
The roofing contractor will conduct a thorough assessment of the repairs, examining the workmanship, materials used, and overall quality. They’ll compare the repairs to the initial assessment and repair plans to confirm that everything aligns as intended.
Document the date, details of the inspection, and any notes about the work that was done. Knowing that your roof has undergone a successful final inspection adds an extra layer of security.
10. Close the Claim
This step signifies that the repairs have been successfully carried out. This resolution is a testament to the successful collaboration between you, your roofing contractor, and your insurance company.
Your insurance company will review the documentation, ensure that all repairs have been completed as agreed, and confirm that the terms of the settlement have been fulfilled.
After the claim is closed, any outstanding payments or reimbursements are settled. If you had any out-of-pocket expenses that were covered by the settlement, you should receive the agreed-upon funds.
Navigating roof insurance claims can be tricky, but by following these steps and staying organized, you should be able to successfully navigate the process. You can successfully deal with roof insurance claims and restore the protection and value of your home.